Create schedules for your classes and publish them so parents can view upcoming class events from their login.
Class Scheduling allows administrators to build a calendar of events for a class. You can add one-time events, create recurring events, manage changes, and publish the schedule when it is ready for parents to view.
Class Scheduling is part of TUIO’s Attendance and Class Management features. If you do not see the Attendance tab, log out and back in to refresh your permissions. If it still does not appear, contact support@tuiopay.com
Overview
Class schedules live inside a class. Before creating a schedule, the class must already exist in TUIO.
A class schedule can include:
- One-time events
- Recurring events
- Event locations
- Event notes
- Cancelled events
- Published or unpublished schedules
Once a class is published, parents can view the class schedule from their own login. Parents see a read-only calendar and cannot add, edit, or delete events.
For help creating classes and placing students, review this guide first:
How to Create Classes and Place Students
Before You Begin
Before creating a class schedule, make sure:
- The class already exists in TUIO.
- The class has the correct start and end dates.
- Students have been placed into the class, if parents need to see the schedule.
- The class location has been added, if applicable.
- Your organization timezone is correct.
Times are shown using your organization’s timezone. If schedule times appear incorrect, contact support@tuiopay.com so the timezone can be reviewed.
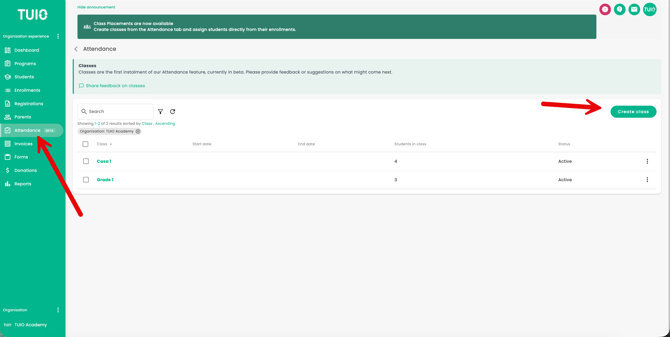
Step 1 — Go to the Attendance Tab
From the left-hand menu, click Attendance.
You will land on the Classes list. From here, you can open an existing class or create a new class.
Step 2 — Open the Class
Click the class you want to schedule.
When you open a class, you will see several tabs:
- Settings — class name, dates, location, capacity, and publish status
- Schedule — the calendar where events are added and managed
- Students — students placed in the class
- Audits — history of changes, if you have permission
Click the Schedule tab.
Step 3 — Review the Class Settings
Before building the schedule, it is recommended to review the class settings.
Go to the Settings tab and confirm:
- Class name
- Start date
- End date
- Location
- Maximum student capacity, if applicable
The class start and end dates are helpful because they can be used as the default date range for recurring events.
Click Save if you make any changes.
Tip: Build out the schedule while the class is unpublished, then publish the class once the schedule is ready for parents.
Step 4 — Open the Schedule Calendar
Go to the Schedule tab.
The schedule opens as a calendar. You can view the calendar by:
- Day
- Week
- Month
The calendar opens in Week view by default.
Events are colour-coded by status:
- Scheduled — upcoming event
- Completed — event time has passed
- Cancelled — event was cancelled
The publish status is also shown so you can quickly confirm whether the class schedule is visible to parents.

Step 5 — Add a One-Time Event
To add a one-time event, click an empty time slot on the calendar.
In Day or Week view, you can also click and drag across a time range to set the event start and end time.
The Create event window will open.
Complete the event details:
- Name — the title shown on the calendar
- Location — optional; if left blank, the class location is used
- Frequency — select Once
- Date
- Start time
- End time
- Notes — optional
Click Create to save the event.
If the event date is outside the class start and end dates, TUIO may show a reminder. This is only a warning and does not prevent you from saving the event.
Step 6 — Add a Recurring Event
Recurring events repeat automatically on selected days of the week.
To create a recurring event, click an empty time slot on the calendar.
In the Create event window, set the frequency to Recurring.
Complete the recurring event details:
- Days of week — choose one or more days
- Start date
- End date
- Start time
- End time
- Location — optional
- Notes — optional
Click Create.
TUIO will create the recurring events for each selected day within the date range.
[Insert screenshot: create recurring event window]
If you leave the recurring event start and end dates blank, TUIO can use the class start and end dates as the default range.
Step 7 — View or Edit an Event
Click any event on the calendar to open it.
The event details may include:
- Class
- Event status
- Date
- Time
- Location
- Notes
- Recurring schedule details, if applicable
From the event window, you can:
- Close the event
- Edit the event
- Edit the recurring series, if the event is recurring
Step 8 — Edit a Single Event
To edit one event, open the event and click Edit.
You can update details such as:
- Name
- Location
- Date
- Start time
- End time
- Notes
Click Save once complete.
For a one-time event, the changes are saved directly.
For a recurring event, editing one event creates an exception for that specific occurrence. The rest of the recurring series remains unchanged.
Step 9 — Edit a Recurring Series
To update all events in a recurring series, open one event in the series and click Edit recurring.
You can update:
- Series name
- Location
- Days of the week
- Start time
- End time
- Start date
- End date
Click Save to apply the changes to the recurring series.
If the recurring date range is shortened, TUIO may ask what to do with customized events that fall outside the new range. You may be able to delete those events, keep them, or cancel the change.
Step 10 — Move an Event on the Calendar
If you have edit access, you can move an event by dragging it to a new time on the calendar.
You can also drag the edge of an event to adjust its duration.
After moving or resizing the event, TUIO will ask you to confirm the change.
If you cancel, the event will return to its previous time.
Dragging to create or adjust events works in Day and Week view. In Month view, click the day to create an event.
Step 11 — Cancel, Delete, or Re-enable an Event
When editing an event, open the Options menu.
Depending on the event status, you may be able to:
- Cancel event — marks the event as cancelled and keeps it visible on the calendar
- Delete event — removes the event from the calendar
- Re-enable event — restores a cancelled event
TUIO will ask you to confirm before applying the change.
Step 12 — Publish the Class Schedule
Parents can only see schedules for published classes.
To publish the class:
- Open the class.
- Go to the Settings tab.
- Click Options.
- Select Publish.
- Confirm the change.
Once published, parents with students placed in the class can view the schedule from their login.
To hide the schedule from parents, return to Settings, click Options, and select Unpublish.
How Parents See the Schedule
Once a class is published, parents can view the schedule from their own login.
Parents can:
- Select a student
- View class events for that student
- Switch between Day, Week, and Month views
- Open an event to see details
- Print the schedule when not using the mobile view
Parents cannot add, edit, move, cancel, or delete events.
Only published class schedules are visible to parents. Unpublished classes remain hidden.
Quick Reference
I want to add a one-time event
Open the class → Schedule → click an empty time slot → choose Once → enter event details → Create.
I want to add a recurring event
Open the class → Schedule → click an empty time slot → choose Recurring → select days and times → Create.
I want to edit one event
Click the event → Edit → make changes → Save.
I want to edit a full recurring series
Click an event in the series → Edit recurring → make changes → Save.
I want to move an event
Drag the event to a new time → confirm the change.
I want to cancel an event
Open the event → Edit → Options → Cancel event.
I want to delete an event
Open the event → Edit → Options → Delete event.
I want parents to see the schedule
Go to class Settings → Options → Publish.
I want to hide the schedule from parents
Go to class Settings → Options → Unpublish.
Tips
Build your schedule while the class is unpublished, then publish it when it is ready for parents.
Use clear event names that parents and staff will understand.
Confirm the class start and end dates before creating recurring events.
Use recurring events for schedules that repeat weekly.
Use one-time events for special activities, meetings, closures, or schedule changes.
Check the organization timezone if event times appear incorrect.
Make sure students are placed in the class before expecting parents to see the schedule.
FAQ & Troubleshooting
Why can’t parents see the class schedule?
Parents can only see schedules for published classes. Go to the class Settings tab and confirm the class is published.
Also confirm the student has been placed in the class.
Can parents edit the schedule?
No. Parents can view the schedule, but they cannot add, edit, move, cancel, or delete events.
Can I create recurring events?
Yes. When creating an event, choose Recurring, then select the days of the week and the date range.
Can I change only one event in a recurring series?
Yes. Open the event and choose Edit. Changes made to one event in a recurring series will apply only to that occurrence.
Can I change the whole recurring series?
Yes. Open one event in the series and choose Edit recurring.
Why does an event show as completed?
Events are marked as completed once their scheduled time has passed.
Why do the times look wrong?
Class schedule times use your organization timezone. If the times do not look correct, contact support@tuiopay.com so your organization timezone can be reviewed.
Why can’t I add or edit events?
You may not have permission to edit the class schedule. If the calendar is read-only, contact an administrator at your organization or reach out to support@tuiopay.com.
Can I schedule an event outside the class date range?
Yes. TUIO may show a reminder if the event falls outside the class start and end dates, but you can still save it.
Do I need to create the class first?
Yes. Class schedules are created inside a class. If the class does not exist yet, create the class first.
For help creating classes, review:
How to Create Classes and Place Students
Need Help?
If you have questions about creating or publishing class schedules, contact support@tuiopay.com. Our team can help you review your class setup and confirm that schedules are visible to the right families.