Create classes from the Attendance tab and assign students using their enrollments.
The Attendance tab allows administrators to create classes and place students into those classes. Class placements are linked to student enrollments, which helps keep class lists organized and makes it easier to manage attendance-related workflows as this feature continues to expand.
Classes are the first installment of TUIO’s Attendance feature and are currently in beta. If you have feedback or suggestions, you can share them with the TUIO team directly from the Attendance page.
Overview
Class placements let you group enrolled students into a class, grade, room, cohort, camp group, or any other class structure your organization uses.
You can place students in a class from:
- The Attendance tab
- The Students tab
- The Student profile
- The Enrollments tab
Each class placement must be linked to a student enrollment. This helps ensure the student’s placement is connected to the correct program.
Before You Begin
Before placing students in a class, make sure:- The student already exists in TUIO.
- The student has an active or pending enrollment.
- You know which class the student should be placed into.
- If using class dates, the class has the correct start and end dates entered.
If a student does not have an enrollment yet, create or update the enrollment first before placing the student in a class.
Step 1 — Go to the Attendance Tab
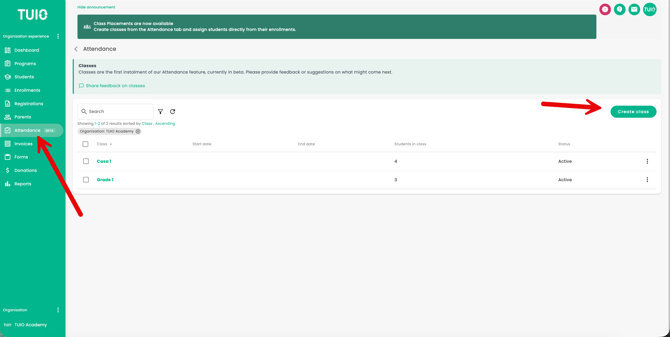
From the left-hand menu, click Attendance.
You will see a list of existing classes, including:
- Class name
- Start date
- End date
- Number of students in the class
- Status
Step 2 — Create a Class
Click Create class.
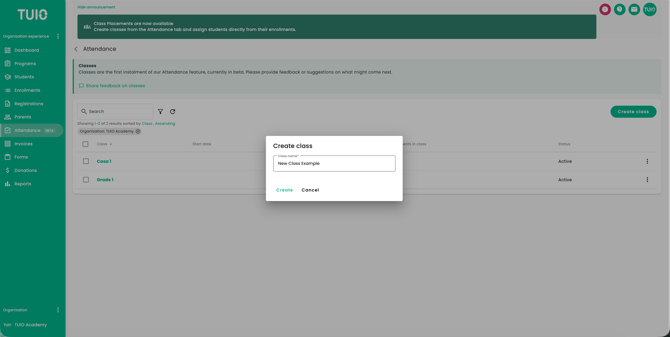
Enter the class name, then click Create. After the class is created, it will appear in the Attendance class list.
Examples of class names may include:
- Grade 1
- Casa
- Summer Camp
- Toddler Room
- Aftercare Group
- Etc.
Step 3 — Add Class Details
Open the class and go to the Settings tab.
From here, you can add or update:
- Class name
- Maximum student capacity, if applicable
- Start date
- End date
- Location
Click Save once your class details are complete.
Class start and end dates are useful because they can be automatically applied when placing students into the class.
Step 4 — Place Students in the Class
Open the class and go to the Students tab.
Click Place students.
This opens the Place students wizard.
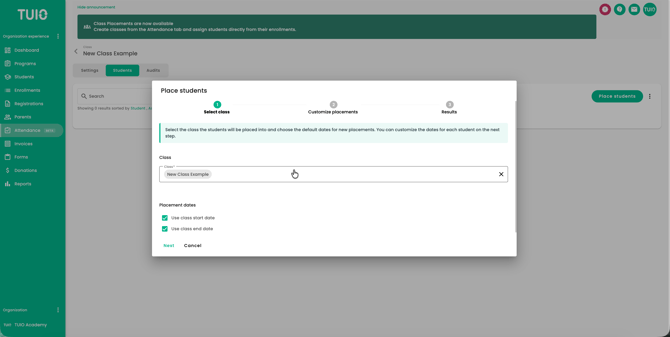
Step 5 — Select the Class
In the first step of the wizard, confirm the class where students will be placed.
You can also choose whether placement dates should use the class start and end dates by selecting:
- Use class start date
- Use class end date
Click Next.
Step 6 — Add Students
On the next step, click Add students.
Search for and select the students you want to place in the class.
Click Add.
Step 7 — Confirm the Student Enrollment
For each student, select the enrollment that should be linked to the class placement.
Each placement must be connected to an enrollment. This ensures the class placement is tied to the correct student record and program.
If the class has start and end dates, TUIO can use those dates automatically for the placement. You can also adjust dates manually where needed.
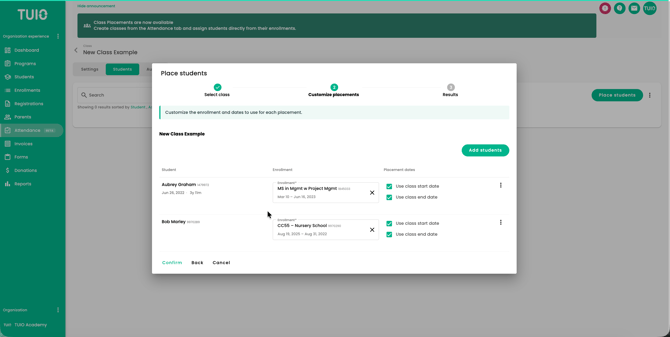
Click Confirm once the student placement details are correct.
Step 8 — Review the Results
After confirming, TUIO will show how many placements were created successfully.
Click Done to return to the class.
The students will now appear in the class list.
Other Ways to Place Students in a Class
Students can also be placed into a class from the Students tab or the Enrollments tab.
Option 1 — Place a Student from the Students page
Go to Students.
Find the student(s) you want to place in a class.
Click the three-dot menu beside the student and select Place student in class or bulk select the students and select Place studens in class.
Follow the same placement wizard to select the class, confirm the enrollment, and set the placement dates. This can also be done in bulk using the bulk actions.
This option is useful when you are already working from a student profile or student list. You can also place the student directly from their profile.
Option 2 — Place a Student from the Enrollments page
Go to Enrollments.
Find the student enrollment(s) you want to use.
Click the three-dot menu beside the enrollment and select Place student in class. This can also be done in bulk using the bulk actions.
This option is useful when you want to make sure the class placement is tied to a specific enrollment. When bulk selecting multiple enrollments for the same student, only the first shown Enrollment will be used.
Downloading a Class List
From the Attendance class list, click the three-dot menu beside a class.
Select Class list under the Download section.
The class list download can be used to review the students assigned to a class.
Student details may include helpful identifying information such as:
- Student name
- Date of birth
- Age
- Student identifier
Editing Class Placements
After students have been placed in a class, you can return to the class and adjust placements if needed.
You may be able to update:
- Placement start date
- Placement end date
TUIO will validate the placement dates to help prevent incorrect date ranges, such as an end date that comes before the start date and that it does not overlap with an existing placement in the class.
Tips
Use clear class names that your team will recognize, such as the grade, room, program, or camp group.
If the class has a fixed start and end date, enter those dates on the class settings page first so they can be reused during student placement.
When placing students, confirm the enrollment carefully, especially if the student has more than one enrollment.
Use the Enrollments tab placement option when the enrollment itself is the most important reference point.
Use the Students tab placement option when you are working from a student list and only need to place one student quickly.
FAQ & Troubleshooting
Why do I need to select an enrollment when placing a student in a class?
Class placements must be linked to an enrollment so the placement is connected to the correct program and student record. This helps keep class lists accurate and supports future attendance-related workflows.
Can I place multiple students in a class at once?
Yes. From the class, click Place students, then use Add students to select multiple students before confirming their placements. You can also bulk select students from the Students page or bulk select Enrollments from the Enrollments page.
Can I place one student directly from their student record?
Yes. Go to the Students tab, open the student’s three-dot menu, and select Place student in class.
Can I place a student directly from an enrollment?
Yes. Go to the Enrollments tab, open the enrollment’s three-dot menu, and select Place student in class.
What happens if the class has start and end dates?
When placing students, you can choose to use the class start and end dates as the placement dates. This saves time and helps keep placement dates consistent.
Can placement dates be different from the class dates?
Yes. Placement dates can be adjusted if a student starts the class curriculum late, leaves early, or only attends for part of the class period.
Can I download a class list?
Yes. From the Attendance class list, click the three-dot menu beside the class and select Class list.
I don’t see the Attendance tab. What should I do?
If you do not see the Attendance tab, log out and back in to refresh your permissions. If it still does not appear, contact support@tuiopay.com.
Need Help?
If you have questions about creating classes or placing students, contact support@tuiopay.com. Our team can help you review your setup and make sure students are placed correctly.