
Account credits let you give a parent a balance that can pay one or more invoices, in full or in part. You can allocate the balance automatically to eligible unpaid invoices, or choose a specific credit from an invoice.
This guide covers creating and managing individual credits from a parent's profile. To create monthly credits in bulk from a CSV file, see How to Import Credits.
Overview
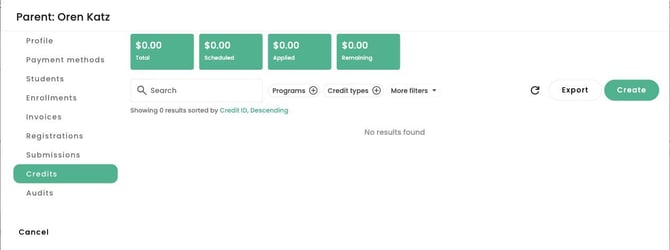
Credits are found under Parents > open the parent > Credits.
From the Credits tab, you can:
- Create a credit with a description, amount and optional credit type
- Choose whether new credit payment transactions are tax receiptable
- Automatically allocate the balance to invoices, with restrictions for dates, students, programs and invoice types
- Review scheduled and applied allocations
- Notify the parent, export credits, or delete an unused credit
Scheduled and Applied are different. A scheduled allocation reserves credit for an invoice. It becomes an applied credit payment through scheduled processing once the invoice's payment due date has arrived and the invoice is eligible. You can also choose to apply a credit immediately from the invoice.
Before You Begin
- Open the parent who should hold the credit and check the organization.
- Decide whether to allocate the credit automatically or add it to individual invoices yourself.
- If using automatic allocation, decide which students, programs, invoice types and due dates qualify.
Permissions required: you need Payment Method: read to see the Credits tab and Payment Method: write to create or manage credits. To open an invoice's Credits dialog, you need Invoice & Transaction: read. Adding an allocation requires both Payment Method and Invoice & Transaction write access; editing or removing an allocation requires Invoice & Transaction write access.
Step 1: Open the Parent's Credits
- Open Parents from the main menu.
- Open the parent, then select Credits.
The summary tiles show the parent's active credits:
| Tile | What it means |
|---|---|
| Total | The total amount of all active credits |
| Scheduled | Allocated to invoices but not yet applied as payment |
| Applied | Already used to pay invoices |
| Remaining | Not yet allocated to an invoice |
Each credit's Available balance is its amount minus scheduled and applied allocations. Search by credit ID or description, or filter by program, credit type, valid-from date, student or invoice type. Show deleted displays deleted credits.
Step 2: Create a Credit
- Click Create.
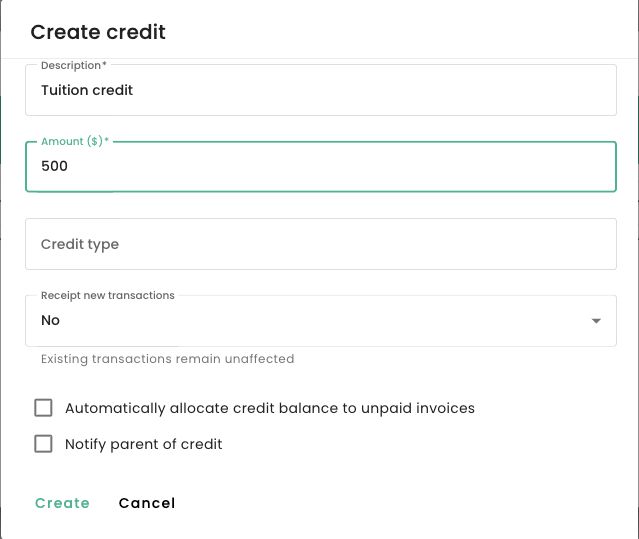
- Complete the credit details below.
| Field | What to enter |
|---|---|
| Description | Required. Up to 30 characters. This appears on the credit list, invoice allocations and parent notification. |
| Amount ($) | Required. Enter an amount greater than zero. |
| Credit type | Optional. Categorizes the credit. A Default type is preselected when one exists. |
| Receipt new transactions | Choose whether future payment transactions created by this credit are tax receiptable. |
| Automatically allocate credit balance to unpaid invoices | Optional. Enables automatic allocation and the restrictions described in Step 3. |
| Notify parent of credit | Optional. Sends the parent an email after the credit is saved. |
Choosing a Credit Type
Start typing in Credit type to search, or click the field to browse. Only active types appear. Archived, deleted and import-only types cannot be selected when creating a credit by hand.
Click Manage credit types at the bottom of the list to create or edit a type. See Managing Credit Types below.
Receipt New Transactions
- Same as credit type (Yes/No): follows the type's Tax receiptable by default setting. This is offered when a type is selected and is preselected for a new credit.
- Yes: makes new transactions receiptable.
- No: makes new transactions non-receiptable. This is preselected when no type is selected.
Existing transactions remain unaffected. Changes apply only to transactions created after you save the setting.
Step 3: Choose Automatic Allocation or Save for Later
To allocate the credit yourself later, leave automatic allocation off and click Create. You can then add the credit from an invoice as described in Step 4.
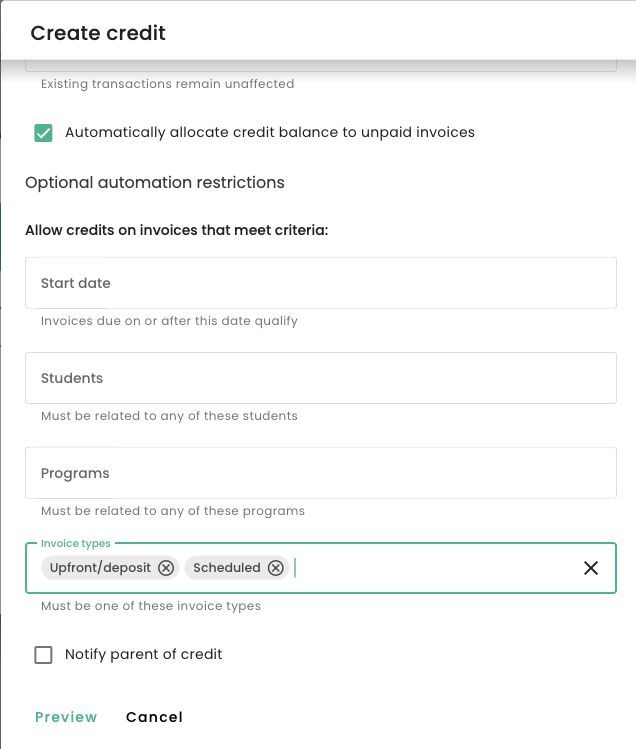
To have TUIO allocate it for you, tick Automatically allocate credit balance to unpaid invoices.
Optional Automation Restrictions
An invoice must match every restriction you set. An empty restriction does not limit the allocation.
| Restriction | Which invoices qualify |
|---|---|
| Start date | Invoices due on or after this date |
| Students | Invoices for any of the selected students |
| Programs | Invoices whose enrollment or registration relates to any selected program |
| Invoice types | Invoices containing an item of one of the selected types |
Invoice types are filled in automatically when you enable allocation. Review the selection and remove any types you do not want. School administrators see Upfront/deposit and Scheduled. Turning automatic allocation off clears the restrictions.
Preview and Confirm
- Click Preview to open Confirm credit application.
- Review the starting credit balance, each invoice's allocation adjustment and adjusted balance, and the remaining credit balance.
- Click Confirm to save, or Back to change the settings.
The preview does not save the credit. If no invoice qualifies yet, the credit can still be saved and allocated to eligible future invoices when they are created.
How TUIO Allocates the Balance
TUIO considers the parent's invoices in the same organization, fills them oldest due date first and stops when the credit runs out. Each invoice receives no more than its outstanding balance. Eligible invoice states are Pending payment, Payment failed, Declined, Returned and Chargedback, with no payment in progress and all restrictions met.
Automatic allocations start as Scheduled. When a new eligible invoice is created, TUIO checks available automatic credits and uses the oldest credit first. Invoices on hold or with a payment in progress are skipped.
Step 4: Add a Credit from an Invoice
Use this option to allocate a specific credit to a specific invoice, whether or not automatic allocation is enabled on the credit.
- Open the invoice and click Credits. This option is not shown on donation invoices.
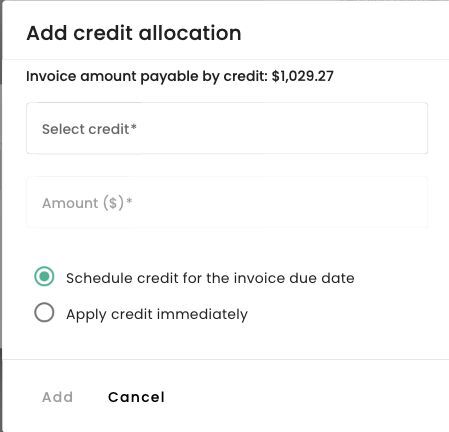
- In Credit allocations, click Add.
- Review the Invoice amount payable by credit.
- Choose an active credit with an available balance under Select credit.
- Enter the Amount ($). It must be greater than zero and cannot exceed either the credit's available balance or the invoice amount payable by credit.
- Choose Schedule credit for the invoice due date (the default), or Apply credit immediately.
- Click Add.
Add is available for invoices in Pending payment, Payment failed, Returned or Chargedback status, subject to your permissions.
Paying the whole invoice: if you choose Apply credit immediately and cover the full amount payable, TUIO asks Mark as paid with credit? Confirming marks the invoice paid and sends the parent the invoice paid notification.
When Scheduled Credits Are Applied
TUIO's scheduled processing applies an allocation once the invoice's payment due date has arrived, the invoice is Pending payment, it is not on hold, and no payment is in progress. Applying it records a credit payment transaction. If the credit covers the invoice, the invoice is marked paid.
Viewing and Editing Credits
Click a Credit ID to open the credit. The General tab contains its settings. The amount cannot be reduced below what has already been applied. Click Update, or Preview when automatic allocation is on.
The Allocations tab lists related invoices, their amounts and states, and whether each allocation is Scheduled, Applied or Deleted. Click an invoice ID to open it. The Audits tab shows change history when you have Audit read access.
Check scheduled allocations before saving an edit. With automatic allocation on, saving recalculates scheduled allocations using the current invoices and restrictions. Turning it off removes scheduled allocations after a preview. If it was already off, saving removes all scheduled allocations, including those added by hand, without a preview. You will need to add those allocations again. Applied allocations are not changed.
Editing or Removing an Invoice Allocation
In the invoice's Credits dialog, click a scheduled allocation's ID to change its amount or apply it immediately. Applied allocations cannot be edited.
To remove an allocation, open its row menu, select Remove and confirm the removal. This is available when the invoice is Pending payment, Payment failed, Returned, Chargedback or Paid.
- Scheduled allocation: the allocation is removed.
- Applied allocation: a refund transaction is created against the credit, then the allocation is removed.
In both cases, the amount returns to the credit's available balance and the invoice balance is recalculated. The removed allocation is shown as Deleted. This reversal returns the amount to the account credit.
Credits Managed by an Import
Credits whose type is marked Used for credit imports are managed through the file import. Their General tab is read-only except for Receipt new transactions. Updating that setting leaves allocations unchanged. These credits cannot be deleted individually or in bulk. Use Import Credits to change them.
Managing Credit Types
Open Manage credit types from the Credit type field. Click Create or an existing type's name.
- Name: required, up to 100 characters.
- Tax receiptable by default: supplies the receipting default for credits set to Same as credit type. Existing transactions need separate adjustment.
- Used for credit imports: makes the type import-only. Its credits can no longer be created, edited or deleted by hand, apart from the per-credit receipting setting.
Use Archive to hide an active type from the picker while keeping it on existing credits, or Unarchive to make it selectable again. A type can be deleted only when no active credit uses it. Deleting it clears the type from linked credits; Restore restores a deleted type.
Other Credit Actions
Notify the Parent
Select Notify parent of credit when creating a credit, or use Notify parent from its row menu later. The email includes the description, amount, available balance, automatic-allocation setting and restrictions. The parent needs an active account email.
Delete an Unused Credit
Open the credit's row menu, select Delete and confirm. Individual deletion is available only for an active credit with nothing applied that is not import-managed. Deleting it removes scheduled allocations and recalculates the affected invoices.
To delete several credits, select them and click Delete in the selection bar. All selected credits must be active and not import-managed. Credits with applied amounts are skipped, and the results dialog reports which credits were not deleted.
Export or View Related Invoices
Click Export to download the parent's credits as a CSV, using the list's current filters and sort, including Show deleted. The export includes amounts, type, receipting, automatic-allocation settings and restrictions. Dates are in Eastern Time.
Use View related > Invoices from a credit's row menu to open its related invoices.
Quick Reference
I want to create a credit for one parent
Go to Parents > open the parent > Credits > Create. Enter the description and amount, choose the settings, then save.
I want TUIO to allocate the credit automatically
Enable Automatically allocate credit balance to unpaid invoices, review the restrictions, then click Preview and Confirm.
I want to use a credit on one invoice now
Open the invoice > Credits > Add, select the credit and amount, and choose Apply credit immediately.
I want to reverse an applied credit
Open the invoice's Credits dialog and remove the allocation. TUIO records the reversal and returns the amount to the credit's available balance.
I want to create monthly credits for many families
Use How to Import Credits.
Troubleshooting
The Credits tab or Create button is missing
Check your Payment Method permission for the parent's organization. Read access is needed for the tab, and write access for Create. A deleted credit or missing write access also prevents its Credit ID from opening.
A credit type is missing, or credit fields are read-only
Archived, deleted and import-only types do not appear in the manual credit picker. Credits managed by an import allow only the receipting setting to be changed by hand.
The preview shows no invoices
Check the invoice states, due dates and every restriction. Review Invoice types, which is pre-filled when automatic allocation is enabled. The credit can still be allocated to eligible invoices created later.
An allocation is still Scheduled
This is expected before the payment due date. After that date, check whether the invoice is on hold, has a payment in progress or is no longer Pending payment. To use the credit now, edit the scheduled allocation and choose Apply credit immediately.
Allocations disappeared after I edited the credit
Saving a credit while automatic allocation is off removes its scheduled allocations, including those added from invoices. Add them again from the relevant invoices.
I cannot reduce the amount, or the credit is not offered on an invoice
A credit cannot be reduced below its applied amount. To reverse an applied amount, remove the relevant invoice allocation first. A credit is unavailable in Select credit if it has no available balance, is deleted or belongs to a different parent. The allocated amount must also fit within the invoice amount payable by credit.
The parent notification failed
If you see Parent does not have an active account email, check the parent's account email. If you selected Notify parent of credit while creating the credit, the credit itself was still saved. Close the dialog and check the list before trying again so you do not create a duplicate.
Need Help?
If you need help creating a credit or understanding an allocation, contact support@tuiopay.com. Include the credit ID, invoice ID and any error message so our team can review it faster.