
Record student attendance for class events, including check-in times, check-out times, absences, notes, and CSV exports.
Attendance tracking allows administrators to record whether students attended a scheduled class event. You can check students in, check them out, mark absences, update individual attendance records, and export attendance history.
Attendance is taken from a specific class event, so you will first need to create a class and add events to the class schedule.
For help creating classes and placing students, review:
How to Create Classes and Place Students in a Class
For help creating class schedules, review:
How to Create and Manage Class Schedules
Overview
Attendance tracking is connected to class schedules.
For each event, you can:
- Check students in
- Check students out
- Mark students absent
- Record exact check-in and check-out times
- Add notes to attendance records
- Update individual attendance records after the fact
- Review attendance history
- Export attendance records to CSV
Attendance records can be managed one student at a time or in bulk.
Attendance is currently in beta. If you do not see the Attendance tab, contact support@tuiopay.com.
Before You Begin
Before taking attendance, make sure:
- The class has been created.
- Students have been placed into the class.
- The class has scheduled events.
- You have access to the Attendance tab.
- Your organization timezone is correct.
All attendance times are shown in your organization’s timezone.
Step 1 — Open Attendance
From the left-hand menu, click Attendance.
You will see two main tabs:
- Classes — where you open classes, view schedules, and take attendance on events.
- Records — where you review and export attendance history.
Step 2 — Open the Class Event
From the Classes tab, open the class you want to manage.
Click the Schedule tab.
Click the event you want to take attendance for.
The event window will open. Click the Attendance tab.
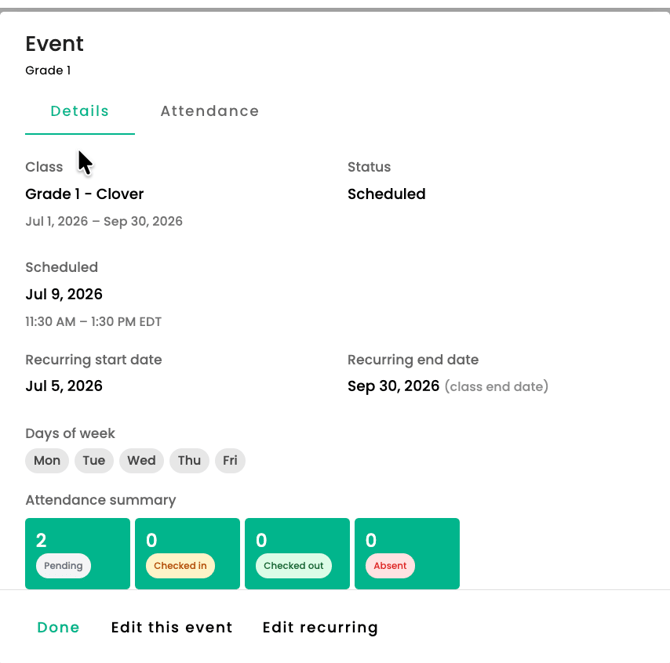
The event may also show an attendance summary with counts for each status:
- Pending
- Checked in
- Checked out
- Absent
Step 3 — Review the Attendance Roster
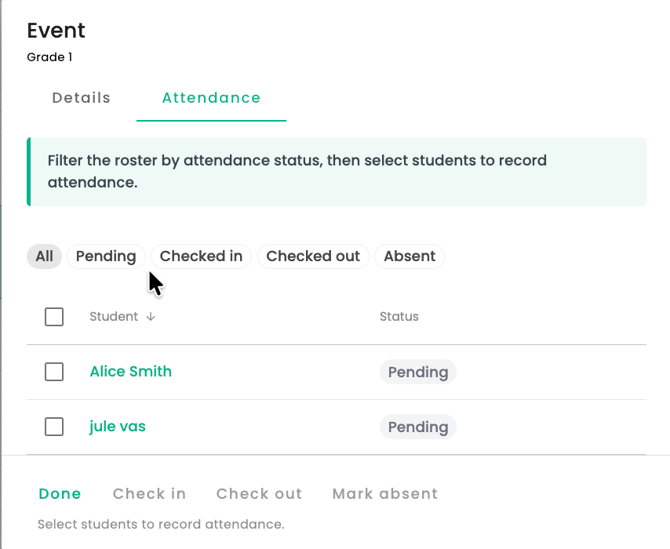
The Attendance tab shows the students expected for that class event.
Each student will show a status:
| Status | Meaning |
|---|---|
| Pending | No attendance has been recorded yet |
| Checked in | A check-in time has been recorded, but no check-out time yet |
| Checked out | Both check-in and check-out times have been recorded |
| Absent | The student has been marked absent |
You can use the status filters to narrow the list before taking action.
Step 4 — Check Students In
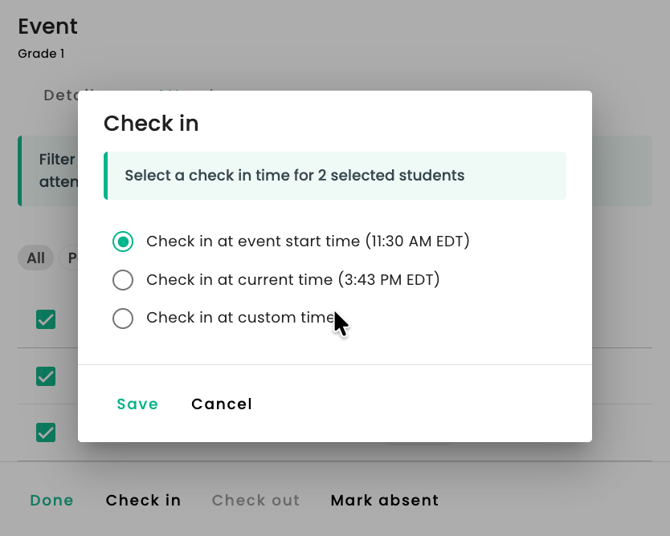
To check students in:
- Select the checkbox beside each student.
- Click Check in.
- Choose the time to record.
- Click Confirm.
You can choose:
- Event start time
- Current time
- Custom time
Use custom time if you are entering attendance after the fact and need to record a specific time.
Step 5 — Check Students Out
To check students out:
- Select the students who are currently checked in.
- Click Check out.
- Choose the time to record.
- Click Confirm.
A student must be checked in before they can be checked out in bulk.
The check-out time must be after the check-in time.
Step 6 — Mark Students Absent
To mark students absent:
- Select the students who should be marked absent.
- Click Mark absent.
- Confirm the action.
Students marked absent are treated as final for that event and will no longer appear as selectable for bulk check-in/check-out actions.
Step 7 — Edit an Individual Attendance Record
You can edit one student’s attendance record if a correction is needed.
Click the student’s name from the attendance roster.
The attendance record window will open.
From there, you can update:
- Status
- Check-in time
- Check-out time
- Note
Click Save when complete.
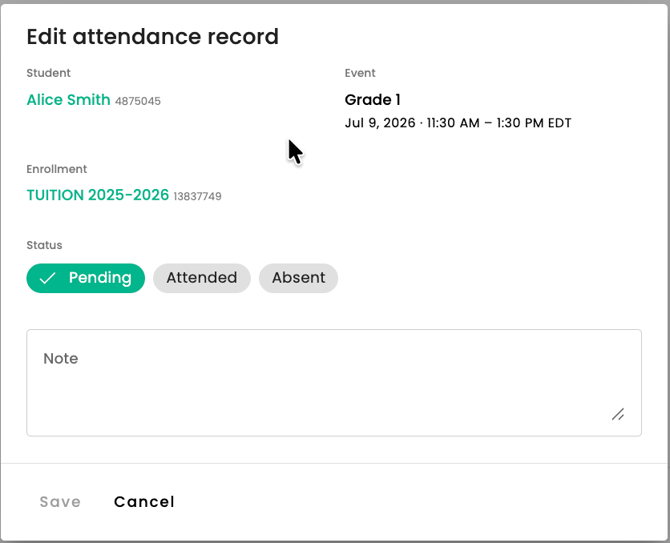
To undo an accidental check-in, open the student’s attendance record and set the status back to Pending.
Step 8 — Add or Update a Note
Attendance records can include a note.
Use notes for context such as late arrival, early pickup, absence reason, or other internal details.
To add a note:
- Open the student’s attendance record.
- Enter the note.
- Click Save.
Step 9 — Review Attendance Records
To review attendance history, go to Attendance > Records.
The Records page shows completed attendance outcomes, such as:
- Checked in
- Checked out
- Absent
Pending records are not shown on the Records page.
You can filter records by:
- Search
- Organization
- Class
- Event
- Student
- Status
- Event date
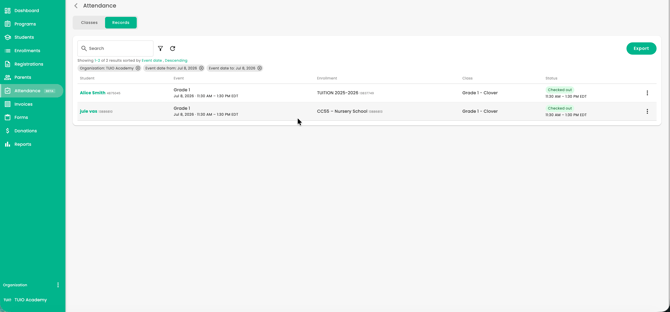
Step 10 — Export Attendance Records
From the Records tab, apply any filters you need.
Click Export to download the filtered attendance records as a CSV file.
The export respects the filters currently applied on the page.
Use this if you need to review, share, archive, or work with attendance records outside of TUIO.
Attendance Settings
Attendance can be controlled at both the organization level and the class level.
Organization settings act as the default. Individual classes can follow the organization default or use their own class-specific settings.
Organization Attendance Settings
Go to Organization Settings > Attendance.
From here, you can set defaults for:
- Check-in process
- Check-out process
- Automation timing
The available options include:
| Setting | Options |
|---|---|
| Check-in process | Automated check-in, Manual check-in, Automated mark absent |
| Check-out process | Automated check-out, Manual check-out |
| Apply automation after | Number of hours after the event ends |
Class Attendance Settings
Each class can either follow the organization default or use its own settings.
To update class attendance settings:
- Go to Attendance > Classes.
- Open the class.
- Go to Settings.
- Open Attendance settings.
- Choose whether the class should use the organization default or custom settings.
- Save your changes.
Use class-specific settings if one class needs to behave differently from the rest of the organization.
For example, after-school care may need different check-in or check-out timing than a regular classroom.
How Automated Attendance Works
If attendance automation is enabled, TUIO can record attendance actions after the event ends.
Depending on your settings, TUIO can:
- Automatically check students in
- Automatically check students out
- Automatically mark students absent
The automation delay controls how long after the event ends TUIO waits before applying the automated action.
For example, if the automation delay is set to 1 hour, TUIO will apply the automated attendance action 1 hour after the event ends.
If manual check-in is enabled with automated check-out, students who were never checked in will not be automatically checked out.
Quick Reference
I want to take attendance for an event
Go to Attendance > Classes > Open class > Schedule > Open event > Attendance.
I want to check students in
Select students > click Check in > choose a time > confirm.
I want to check students out
Select checked-in students > click Check out > choose a time > confirm.
I want to mark students absent
Select pending students > click Mark absent > confirm.
I want to fix one student’s attendance
Click the student’s name > edit the attendance record > save.
I want to undo a check-in
Open the student’s record > set status to Pending > save.
I want to review attendance history
Go to Attendance > Records.
I want to export attendance
Go to Attendance > Records > apply filters > click Export.
I want to change default attendance settings
Go to Organization Settings > Attendance.
I want one class to use different attendance settings
Open the class > Settings > Attendance settings.
Troubleshooting
I do not see the Attendance tab
Attendance must be enabled for your organization, and your user role must have access.
If you do not see the Attendance tab, contact support@tuiopay.com.
I cannot click Check in, Check out, or Mark absent
The selected students may have mixed statuses.
For example, if some students are pending and others are already checked in, the bulk action may not be available.
Use the status filters first, then select students with the same status.
A student has a crossed-out checkbox
This usually means the student is already in a final state for that event, such as Checked out or Absent.
Click the student’s name to edit the individual attendance record if needed.
I entered the wrong check-in time
Open the student’s attendance record, update the check-in time, and click Save.
I accidentally checked in a student
Open the student’s attendance record, change the status back to Pending, and click Save.
The check-out time will not save
The check-out time must be after the check-in time.
Update the check-out time and try saving again.
The attendance times look wrong
Attendance times are shown in your organization’s timezone.
If the times appear incorrect, contact support@tuiopay.com so your organization timezone can be reviewed.
Pending records are missing from the Records tab
This is expected. The Records tab only shows recorded attendance outcomes, such as checked in, checked out, or absent.
Pending records do not appear there.
Students were checked in or checked out automatically
Your organization or class may have automated attendance settings enabled.
Review the attendance settings under Organization Settings > Attendance or the class-specific Attendance settings.
A student was never checked in but was not automatically checked out
This is expected when using manual check-in with automated check-out.
Students who were never checked in are skipped and are not automatically checked out.
Need Help?
If you need help with attendance tracking, contact support@tuiopay.com.
Our team can help review your class setup, attendance settings, and schedule configuration.